This Decision
Optimization
Modeling Assistant example shows you how to create advanced
custom constraints that use Python.
Before you begin
- Requirements
- To edit and run Decision
Optimization models, you must have the following prerequisites:
- Admin or Editor roles
- You must have Admin or Editor roles in the
project. Viewers of shared projects can only see experiments, but cannot modify or run them
- watsonx.ai Runtime service
- You must have a watsonx.ai Runtime service that is
associated with your project. You can add one when you create a Decision
Optimization
experiment.
- Deployment space
- You must have a deployment space that is associated with your Decision
Optimization
experiment. You can choose a deployment space when
you create a Decision
Optimization
experiment.
Open any Decision
Optimization model in the Decision
Optimization
Modeling Assistant. This example uses the Shift
Assignment sample, that is available in the DO-samples, and uses the
AssignmentWithOnCallDuties scenario. The AssignmentWithCustomRule
scenario in this same sample shows you the completed model with this custom constraint already
added.
About this task
The Modeling Assistant provides you with
many constraint suggestions for your problem domain which can be customized. You might, however,
want to express constraints beyond those that are predefined for the given domains. You can achieve
this by using more advanced custom constraints that use Python DOcplex. This
example illustrates how you can create these.
This video provides a visual method to learn the concepts and tasks in this
documentation. After you load the example in your Decision
Optimization
experiment you can follow the video.
Video disclaimer: Some minor steps and graphical steps in this video might
differ from your platform. The user interface is also frequently improved.
Read more in this Decision Optimization blog on custom constraints with Python
found on the IBM Data Science community
page.
Procedure
To create a new advanced custom constraint:
-
In the Build model
view of your open Modeling Assistant model, look at the Suggestions
pane. Click the Display them all icon next to the search field. All the
suggestions are then listed displayed by category. Expand the Others section
to locate New custom constraint, and click it to add it to your model.
Alternatively, without all suggestions and categories displayed, you can enter, for example,
custom in the search field to find the same suggestion and click it to add it
to your model.
A new custom constraint is added to your model.

- Click Enter your constraint. Use [brackets] for data, concepts, variables, or
parameters and enter the constraint you want to specify. For example, type
No [employees] has [onCallDuties] for more than [2] consecutive days and
press enter.
The specification is displayed with default parameters
(
parameter1, parameter2, parameter3) for you to customize. These parameters will be
passed to the Python function that implements this custom rule.

- Edit the default parameters in the specification to give them more meaningful names. For
example, change the parameters to
employees, on_call_duties, and
limit and click enter.
- Click function name and enter a name for the function. For example, type
limitConsecutiveAssignments and click enter.
Your function
name is added and an
Edit Python button appears.

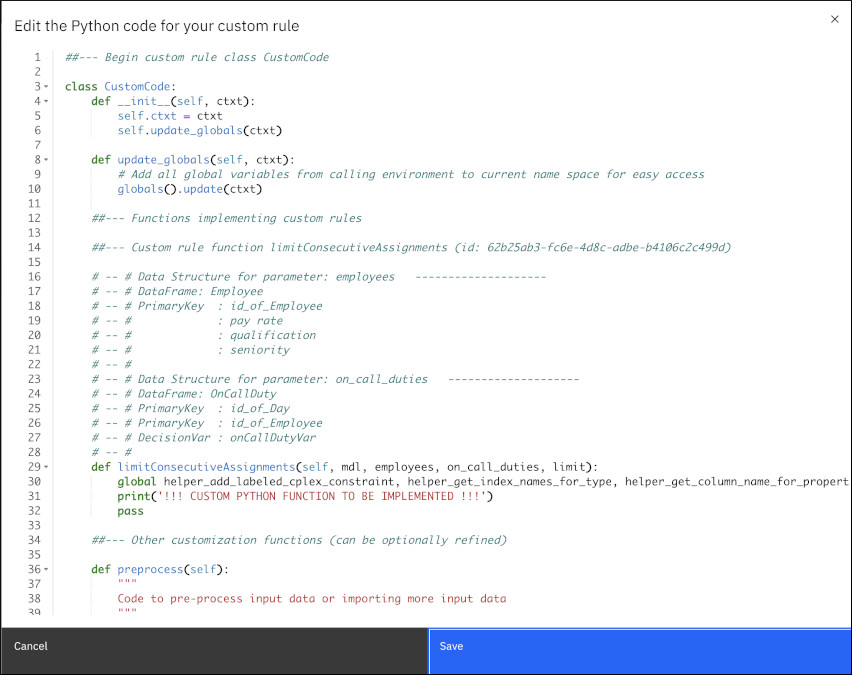
- Click the Edit Python button.
A new window opens
showing you Python code that you can edit to implement your custom rule. You can see your customized
parameters in the code as follows:

Notice that the code is documented
with corresponding data frames and table column names as you have defined in the custom rule. The
limit is not documented as this is a numerical value.
- Optional: You can edit the Python code directly in this window, but you might find it
useful to edit and debug your code in a notebook before using it here. In this case, close this
window for now and in the Scenario pane, expand the
three vertical dots and select Generate a notebook for this scenario that
contains the custom rule. Enter a name for this notebook.
The notebook is created
in your project assets ready for you to edit and debug. Once you have edited, run and debugged it
you can copy the code for your custom function back into this Edit Python
window in the Modeling Assistant.
- Edit the Python code in the Modeling Assistant
custom rule Edit Python window.
For example, you can define
the rule for consecutive days in Python as follows:
    def limitConsecutiveAssignments(self, mdl, employees, on_call_duties, limit):
        global helper_add_labeled_cplex_constraint, helper_get_index_names_for_type, helper_get_column_name_for_property
        print('Adding constraints for the custom rule')
        for employee, duties in employees.associated(on_call_duties):
            duties_day_idx = duties.join(Day)  # Retrieve Day index from Day label
            for d in Day['index']:
                end = d + limit + 1  # One must enforce that there are no occurence of (limit + 1) working consecutive days
                duties_in_win = duties_day_idx[((duties_day_idx['index'] >= d) & (duties_day_idx['index'] <= end)) | (duties_day_idx['index'] <= end - 7)]
                mdl.add_constraint(mdl.sum(duties_in_win.onCallDutyVar) <= limit)
- Click the Run button to run your model with your custom
constraint.
When the run is completed you can see the results in the
Explore solution
view.


