Sharing notebooks with a URL
You can create a URL to share the last saved version of a notebook on social media or with people outside of watsonx.ai Studio. The URL shows a read-only view of the notebook. Anyone who has the URL can view or download the notebook.
Required permissions:
You must have the Admin or Editor role in the project to share a notebook URL. The shared notebook shows the author of the shared version and when the notebook version was last updated.
The behavior of shared notebooks will change so that only users who are logged into the same account from which a notebook is shared can view the active content in that notebook. This change in behavior improves account security and will be
implemented in two phases:
Starting on 24th Jul 2025, active content in newly shared notebooks will no longer be visible to the following types of users:
- Users who are anonymous because they are not logged in or do not have an account
- Users who are logged in to a different account than the account from which the notebook is shared
Starting on 21st Aug 2025, the same rules will be enforced on all previously shared notebooks.
Required action: To continue sharing notebooks that contain active content with anonymous users or users from different accounts after 21st Aug 2025, implement a method to share your notebooks outside of Cloud Pak for Data as a Service.
Sharing a notebook URL
To share a notebook URL:
-
Open the notebook in edit mode: when the notebook preview window opens, click the Edit
 icon.
icon. -
If necessary, add code to hide sensitive code cells.
-
Create a saved version of the notebook by clicking File > Save Version.
-
Click the Share icon
 from the notebook action bar.
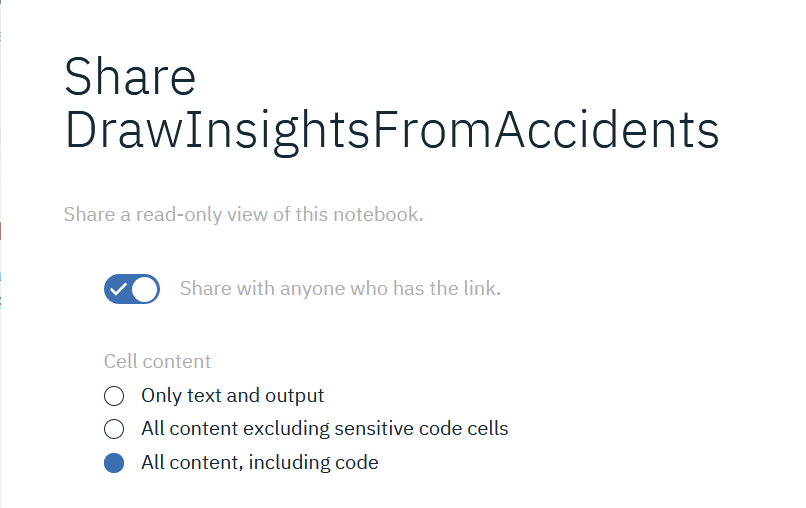
-
Select to share the link.
-
Choose a sharing option:
- Choose Only text and output to hide all code cells.
- Choose All content excluding sensitive code cells to hide code cells that you marked as sensitive.
- Choose All content, including code to show everything, even code cells that you marked as sensitive. Make sure that you remove your credential and other sensitive information before you choose this option and every time before you save a new version of the notebook.
-
Copy the link or choose a social media site on which to share the URL.
Updating a shared notebook
To update a shared notebook:
- Open the notebook in edit mode: when the notebook preview window opens, click the Edit icon.
- Make changes to the notebook.
- Create a new version of the notebook by clicking File > Save Version.
Unsharing a notebook URL
To unshare a notebook URL:
-
Open the notebook in edit mode: when the notebook preview window opens, click the Edit
icon. -
Click the Share icon
from the notebook action bar. -
Unselect the Share with anyone who has the link toggle.
Parent topic: Managing the lifecycle of notebooks and scripts