This Take this tutorial to govern data that was virtualized after completing the Curate high quality data tutorial, Protect your data tutorial, and Virtualize external data tutorial with the Data integration use case of the data fabric trial. Your goal is to protect the virtual data that contains mortgage applicants and applications and their credit scores for unauthorized access. Certain personal information such as social security number, must be masked so that all Golden Bank employees don't have access to that personal information.
The story for the tutorial is that Golden Bank has several departments that need access to high-quality customer mortgage data that is stored across three external data sources. As a Data Steward on the governance team, you must enrich the virtualized data and ensure that the virtualized data is protected.
The following animated image provides a quick preview of what you’ll accomplish by the end of this tutorial. You will add virtual data to your project, and then enrich that data with business terms, and see how IBM Knowledge Catalog data protection rules mask data through Cloud Pak for Data as a Service. Click the image to view a larger image.


Preview the tutorial
In this tutorial, you will complete these tasks:
- Set up the prerequisites.
- Task 1: Enable governance of virtualized data.
- Task 2: Run an SQL query on virtual tables.
- Task 3: Copy virtualized data to your project.
- Task 4: Enrich virtualized data.
- Task 5: View the results of the metadata enrichment.
- Task 6: Publish virtual tables to a catalog.
- Cleanup
 Watch this video to preview the steps in this tutorial. There might be slight differences in the user interface shown in the video. The
video is intended to be a companion to the written tutorial.
Watch this video to preview the steps in this tutorial. There might be slight differences in the user interface shown in the video. The
video is intended to be a companion to the written tutorial.
This video provides a visual method to learn the concepts and tasks in this documentation.
Tips for completing this tutorial
Here are some tips for successfully completing this tutorial.
Use the video picture-in-picture
The following animated image shows how to use the video picture-in-picture and table of contents features:

Get help in the community
If you need help with this tutorial, you can ask a question or find an answer in the Cloud Pak for Data Community discussion forum.
Set up your browser windows
For the optimal experience completing this tutorial, open Cloud Pak for Data in one browser window, and keep this tutorial page open in another browser window to switch easily between the two applications. Consider arranging the two browser windows side-by-side to make it easier to follow along.

Set up the prerequisites
Complete the prerequisite tutorials
To preview this task, watch the video beginning at 00:27.
Complete the following tutorials:
- Virtualize external data tutorial to create virtual tables and join views from data that is stored across three external sources.
- Curate high quality data tutorial to import and enrich data assets and publish them to a catalog.
- Protect your data tutorial to create data protection rules to protect data.
Base Premium Standard Unless otherwise noted, this information applies to all editions of IBM Knowledge Catalog.
Task 1: Enable governance of virtualized data
There are two required steps to enabling governance of virtualized data:
- Enforce data protection rules in Data Virtualization.
- Set up authorization between IBM Knowledge Catalog and Data Virtualization.
Enforce data protection rules
To preview this task, watch the video beginning at 01:02.
Follow these steps to enforce data protection rules in Data Virtualization:
-
From the Navigation Menu
 , choose Data > Data virtualization.
 -
If you see a notification to Set up a primary catalog to enforce governance, click Go to Governance. If you don't see this message, then from the service menu, click Administration > Service settings, and then click the Governance tab.

-
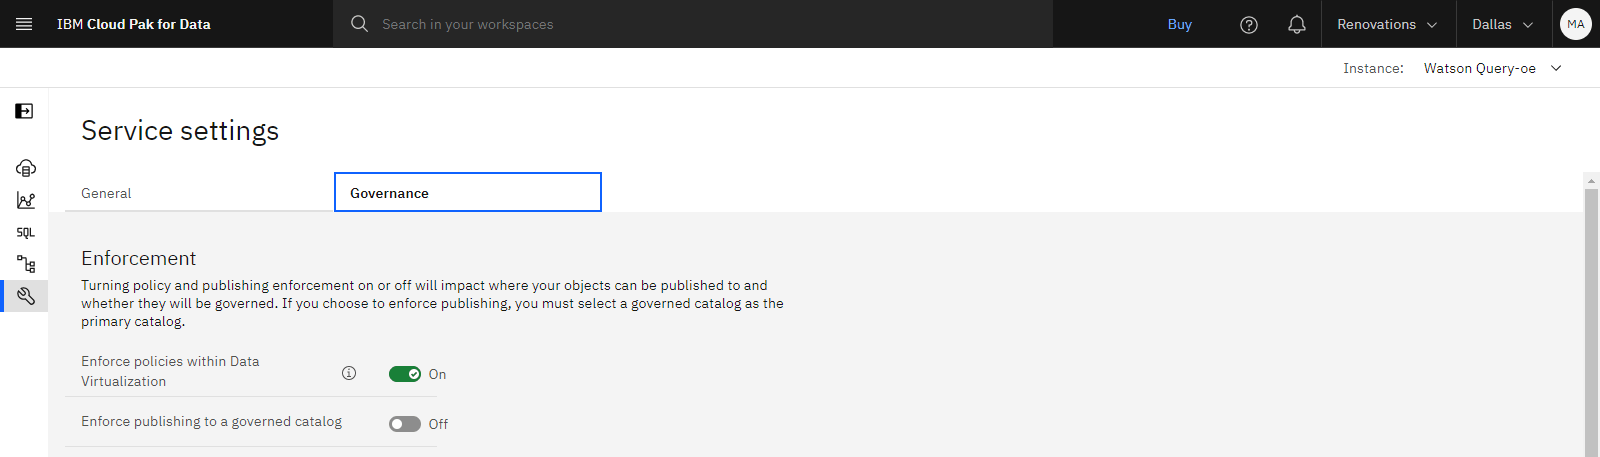
Enable the Enforce data protection rules for virtual objects option, and click Save.
-
From the service menu, return to Virtualization > Data sources.
 Check your progress
The following image shows the Governance tab with policy enforcement enabled. Next, you need to set up authorization between IBM Knowledge Catalog and Data Virtualization.
Set up authorization between IBM Knowledge Catalog and Data Virtualization
To preview this task, watch the video beginning at 01:40.
Follow these steps to set up authorization between IBM Knowledge Catalog and Data Virtualization:
-
Visit the Authorizations page in the IBM Cloud console.
-
Click Create.
-
For the In which account is the service? field, select This account.
-
For the Which service or services need access? field, select IBM Knowledge Catalog.
-
For How do you want to scope the access? to IBM Knowledge Catalog, select All resources.
-
For the What do you want to give the source access to? field, select Data Virtualization.
-
For How do you want to scope the access? to Data Virtualization, select All resources.
-
For Service access, select DataAccess (For Service to Service Authorization Only).
-
Click Authorize.
Check your progress
The following image shows the Authorizations page in IBM Cloud with the authorization between IBM Knowledge Catalog and Data Virtualization. Now you are ready to query governed virtual tables in Data Virtualization.

Task 2: Run an SQL query on governed virtual tables
To preview this task, watch the video beginning at 02:20.
With data protection rules in place, virtual tables are governed by those rules. Follow these steps to run an SQL query on a governed virtual table:
-
From the Data Virtualization service menu, click Run SQL.

-
Copy and paste the following SELECT statement for the new query. Replace
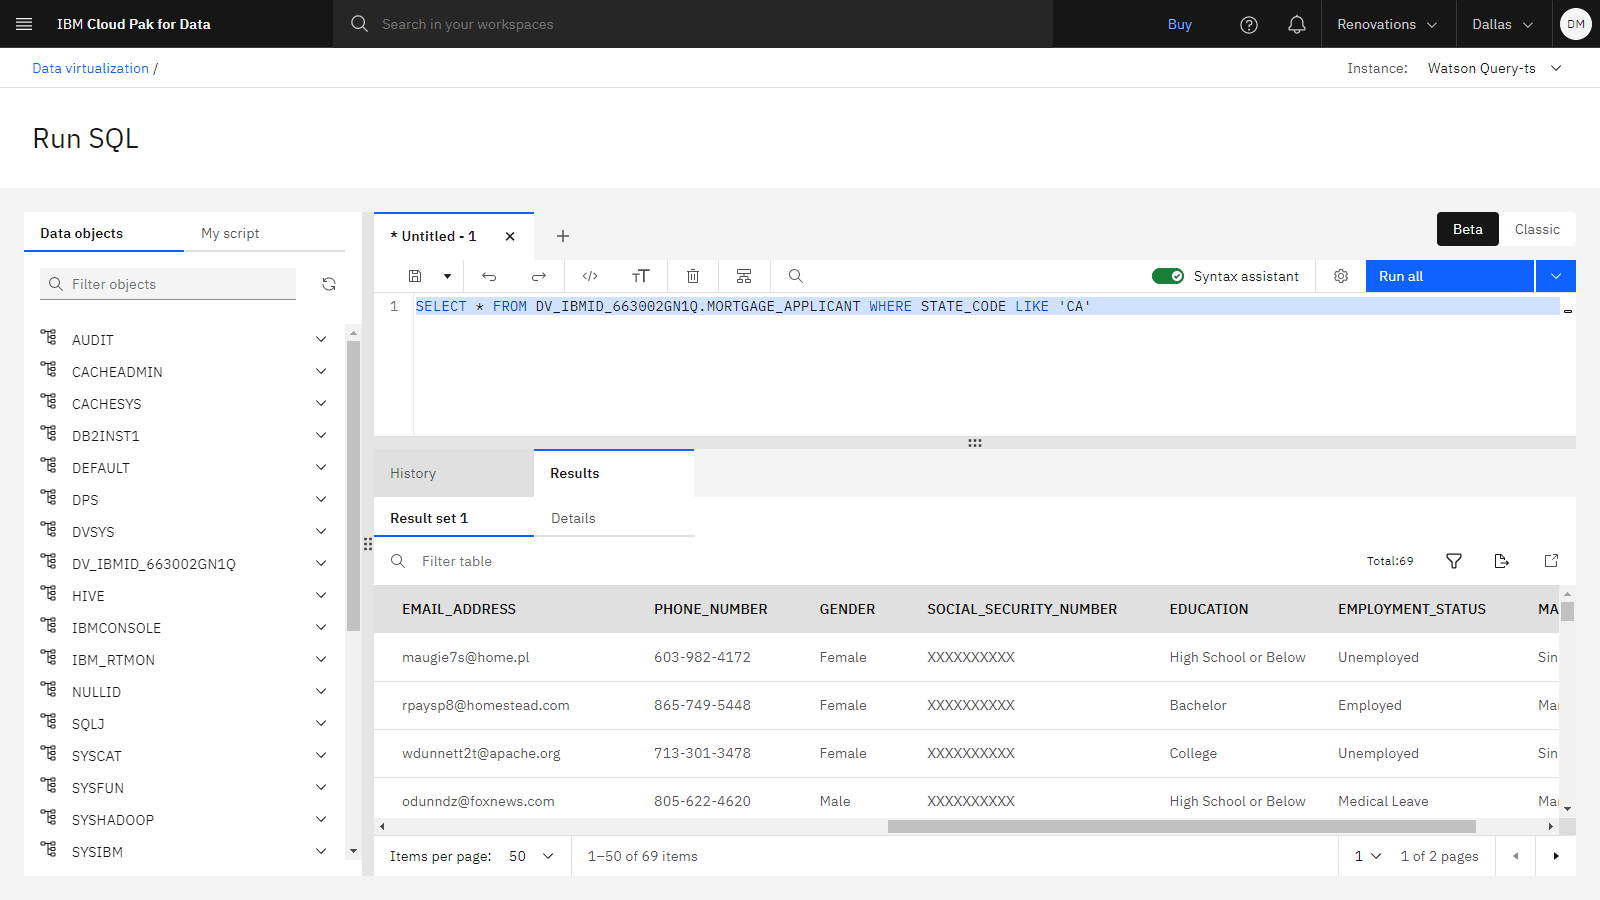
<your schema>with the schema name that you noted earlier.SELECT * FROM <your-schema>.MORTGAGE_APPLICANT WHERE STATE_CODE LIKE 'CA'Your query looks similar to SELECT * FROM DV_IBMID_663002GN1Q.MORTGAGE_APPLICANT WHERE STATE_CODE LIKE 'CA'

-
Click Run all.
-
After the query completes, select the query on the History tab. On the Results tab, you can see that the table is filter to only applicants from the state of California. The data protection rules apply in the Data Virtualization, catalog preview, catalog download, Data Refinery, and Project Asset preview. The rule doesn’t apply to the asset owner.
Watch
the video at 02:47 to see what other users see when they run the SQL query.
Check your progress
The following image shows the SQL query results from the perspective of another user. Now you are ready to copy the virtual tables to your project.
Task 3: Copy the virtual data to your project
To preview this task, watch the video beginning at 03:02.
In the Virtualize external data tutorial, you created virtual tables and virtual join views, and copied them to your Data integration project. If you would like to use that project to complete this tutorial, then skip to Task 3. If you would like to use your Data governance project to complete this tutorial, then follow these steps:
-
From the service menu, click Virtualization > Virtualized data.

-
Select the following tables:
- MORTGAGE_APPLICATION
- MORTGAGE_APPLICANT
- CREDIT_SCORE
- APPLICANTS_APPLICATIONS_JOINED
- APPLICANTS_APPLICATIONS_CREDIT_SCORE_JOINED
-
Click Assign.
-
For the Project, select Data governance.
-
Click Assign.
-
When the virtual objects are successfully assigned, navigate to your project.
-
In the Data governance project, click the Assets tab. The virtual data tables begin with
<your schema>. -
Open any of the virtual data tables. For example, click the APPLICANTS_APPLICATIONS_CREDIT_SCORE_JOINED virtual table to view it.
-
Provide your credentials to access the data asset.
-
For the Authentication method, select API Key.
-
Paste the same API key that you created in the Virtualize external data tutorial.

-
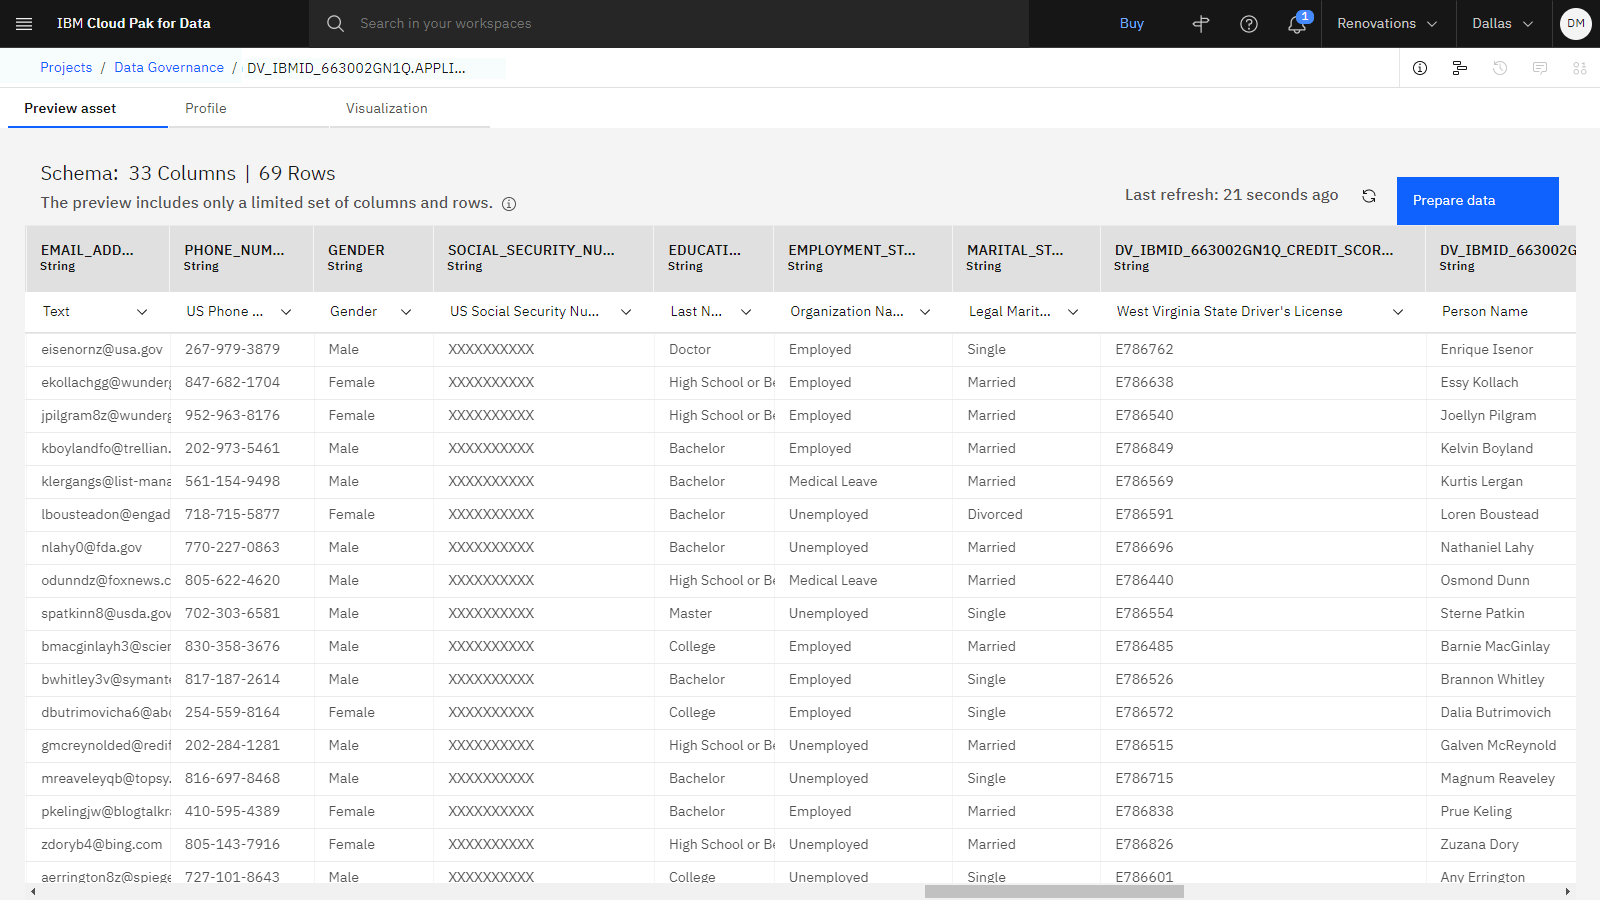
Click Connect. The data protection rules apply in the catalog preview, catalog download, Data Refinery, and Project Asset preview. The rule doesn’t apply to the asset owner.
Watch the video at 04:09 to see what other users see trying to access the virtual data table.
-
Check your progress
The following image shows the virtual table with a masked column in the project from the perspective of a different user. Now you are ready to enrich the data.
Task 4: Enrich the virtual data tables
To preview this task, watch the video beginning at 04:21.
You can enrich data assets with information that helps users to find data faster. Users can use the enrichments to decide whether the data is appropriate for the task at hand, whether they can trust the data, and how to work with the data. Such information includes, for example, terms that define the meaning of the data, rules that document ownership or determine quality standards, or reviews. Follow these steps to enrich the virtual data tables:
-
Click Data governance in the navigation trail to return to the project.

-
On the Assets tab, click New asset > Enrich data assets with metadata.
-
For the name, copy and paste the following text:
Virtual mortgage data - metadata enrichment -
Click Next to continue.
-
Click Select data from project.
-
Select Data asset.
-
Click the checkbox next to the following assets:
<your schema>.MORTGAGE_APPLICATION<your schema>.MORTGAGE_APPLICANT<your schema>.CREDIT_SCORE<your schema>.APPLICANTS_APPLICATIONS_JOINED<your schema>.APPLICANTS_APPLICATIONS_CREDIT_SCORE_JOINED
-
Click Select.
-
-
Click Next to continue to the enrichment objective.
-
Select all enrichment objectives:
- Profile data
- Assign terms
- Run basic quality analysis
-
For Categories, click Select categories.
-
Select only [uncategorized] and Banking.
-
Click Select.
-
-
For the Sampling, select Basic.
-
Click Next to continue to the schedule.
-
Click Next to continue to the review.
-
Click Create.
-
The metadata enrichment asset displays, but the job might take several minutes to complete. Click the Refresh icon
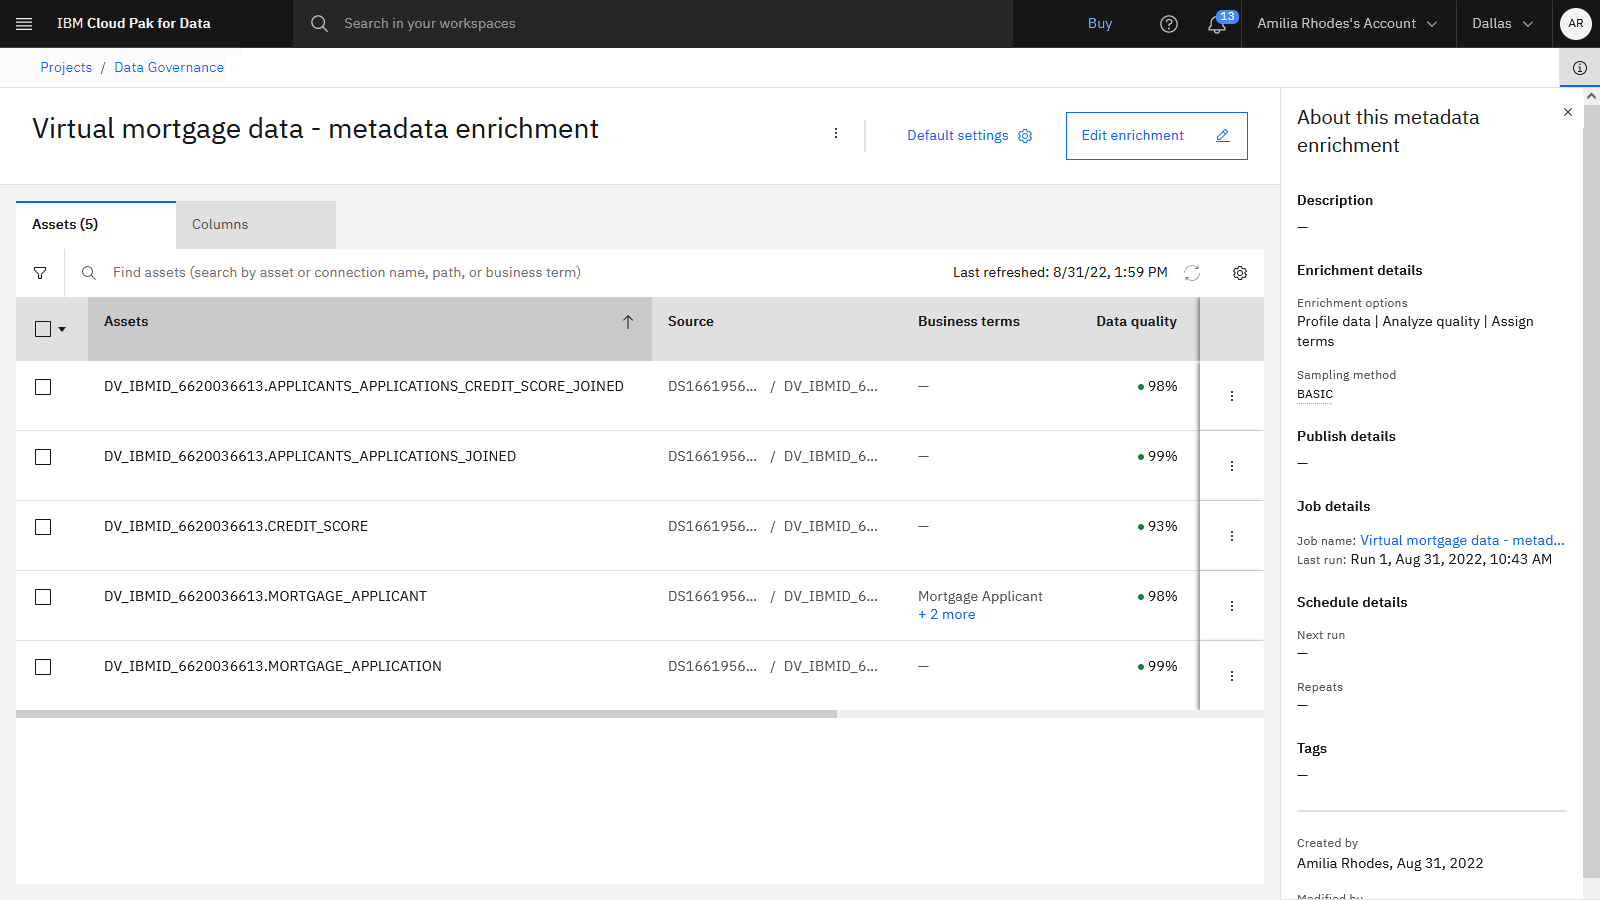
 to watch the status change from Queued to In progress to Finished. When the job run is complete, you see the five assets listed.
Check your progress
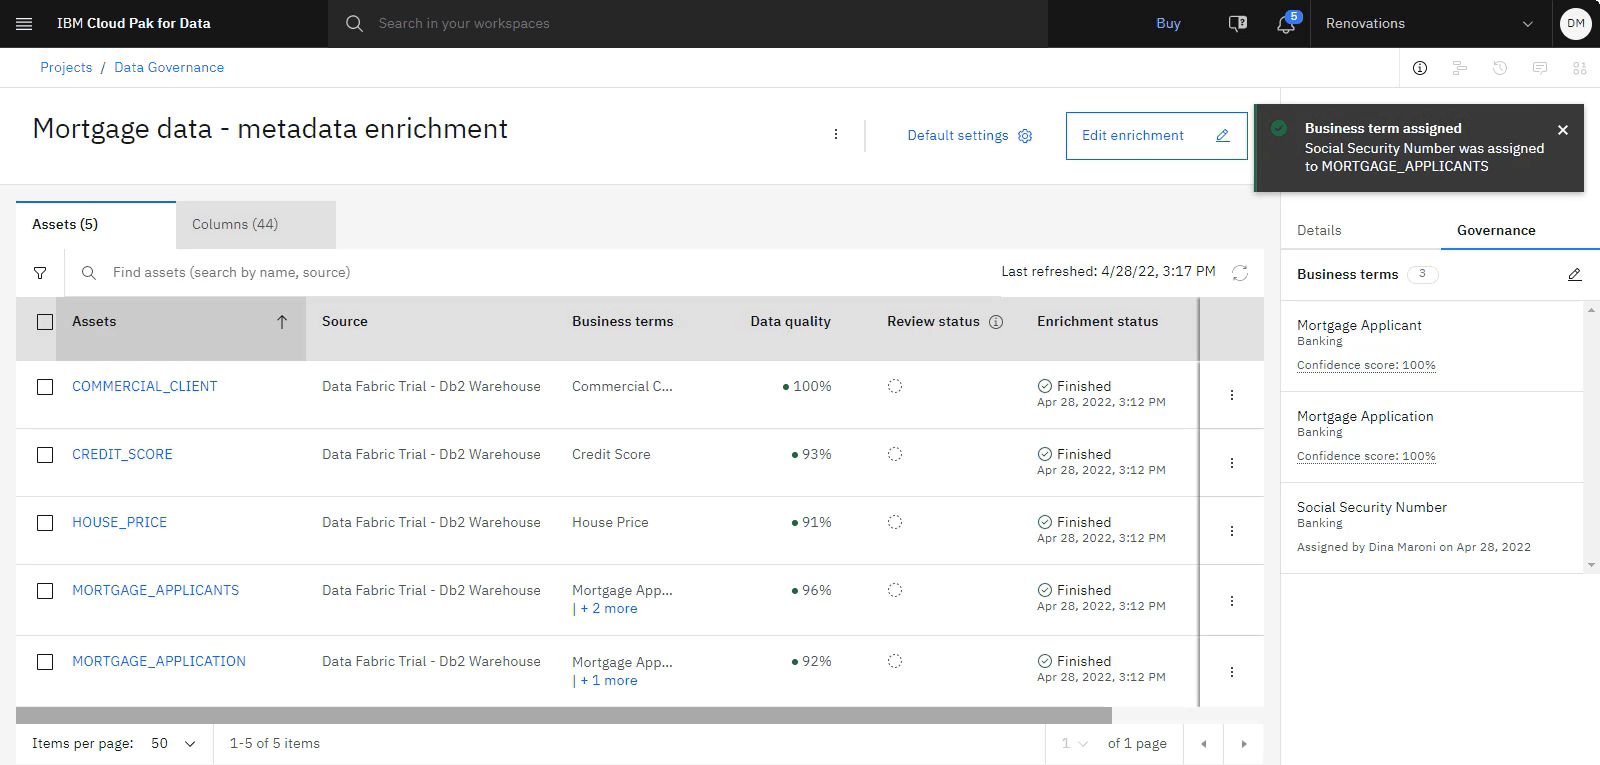
The following image shows the completed metadata enrichment. Now you can explore the enriched data assets.
Task 5: View the results of the metadata enrichment
To preview this task, watch the video beginning at 05:48.
After Metadata enrichment run is completed, follow these steps to view the enriched data:
-
From the Virtual mortgage data - metadata enrichment screen, click the Columns tab.
-
Search for
mortgage_applicant. -
In the list of Columns, locate the EMAIL_ADDRESS column for your-schema.MORTGAGE_APPLICANT asset.
-
Click the Overflow menu
 at the end of the EMAIL_ADDRESS for your your_schema.MORTGAGE_APPLICANT row, and choose View column details.
 -
In the side panel on the Details tab, you see profiling information such as: Format, Frequency distribution, Statistics.
-
In the side panel, click the Governance tab. This tab includes the data classes and business terms that were auto-assigned during the metadata enrichment. You might also see suggested business terms and data classes, and manually assign them.
-
Review any suggested business terms or data classes and manually assign them. For example, you may see Address as a suggested business term.
-
Click Suggested business terms.
-
For Address, click Assign.
-
Click Suggested data classes.
-
For Text, click Assign.
-
-
-
At the end of the EMAIL_ADDRESS column for your your_schema.MORTGAGE_APPLICANT asset row, click the Overflow menu
, and choose View data quality details.-
View the data quality score. IBM Knowledge Catalog automatically generates a data quality score for each column and data asset by analyzing every value in every record according to pre-built dimensions.
-
Click the X to close the Data quality window.
-
-
Search for
credit_score. -
For the CITY column for your_schema.CREDIT_SCORE asset, click the Overflow menu
,
and choose Mark as reviewed. -
Click the Assets tab.
-
In the list of Assets, for your your_schema.MORTGAGE_APPLICANT asset, click the Overflow menu
,
and choose View asset details.-
In the side panel, click the Governance tab to see any business term that were auto-assigned.
-
Click the Add icon
 (or you might see the Edit icon
  ) to manually assign business terms.
 -
Search for
social. If you don't see any results, then make sure that the drop-down list is set to All terms instead of Suggested terms. -
Select Social Security Number.
-
Click Assign.
-
Check your progress
The following image shows the reviewed and enriched data assets. The next step is to publish the enriched data to a catalog to share with your organization.
Task 6: Publish virtual tables to a catalog
To preview this task, watch the video beginning at 7:18.
Now that the virtualized data is enriched with business terms, follow these steps to publish the virtual tables it to a catalog:
-
Click Data governance in the navigation trail to return to the project.
-
Click the Assets tab.
-
Navigate to Data > Data assets.
-
Click the checkbox next to the following assets:
<your schema>.MORTGAGE_APPLICATION<your schema>.MORTGAGE_APPLICANT<your schema>.CREDIT_SCORE<your schema>.APPLICANTS_APPLICATIONS_JOINED<your schema>.APPLICANTS_APPLICATIONS_CREDIT_SCORE_JOINED
-
Click Publish to catalog.
-
Select the Mortgage Approval Catalog (or your catalog name) from the list, and click Next.
-
Select the option to Go to the catalog after publishing it, and click Next.
-
Review the assets, and click Publish.
-
-
In the Mortgage Approval Catalog, search for
<your-schema>. -
Open one of the virtual tables. If prompted, provide your credentials:
-
For the Authentication method, select API Key.
-
Paste the same API key that you created in the Virtualize external data tutorial.
-
-
Click Asset tab to view the data. The data protection rules apply in the catalog preview, catalog download, Data Refinery, and Project Asset preview. The rule doesn’t apply to the asset owner.
Watch the video at 08:17 to see what other users see trying to access the virtual
data table in the catalog.
Check your progress
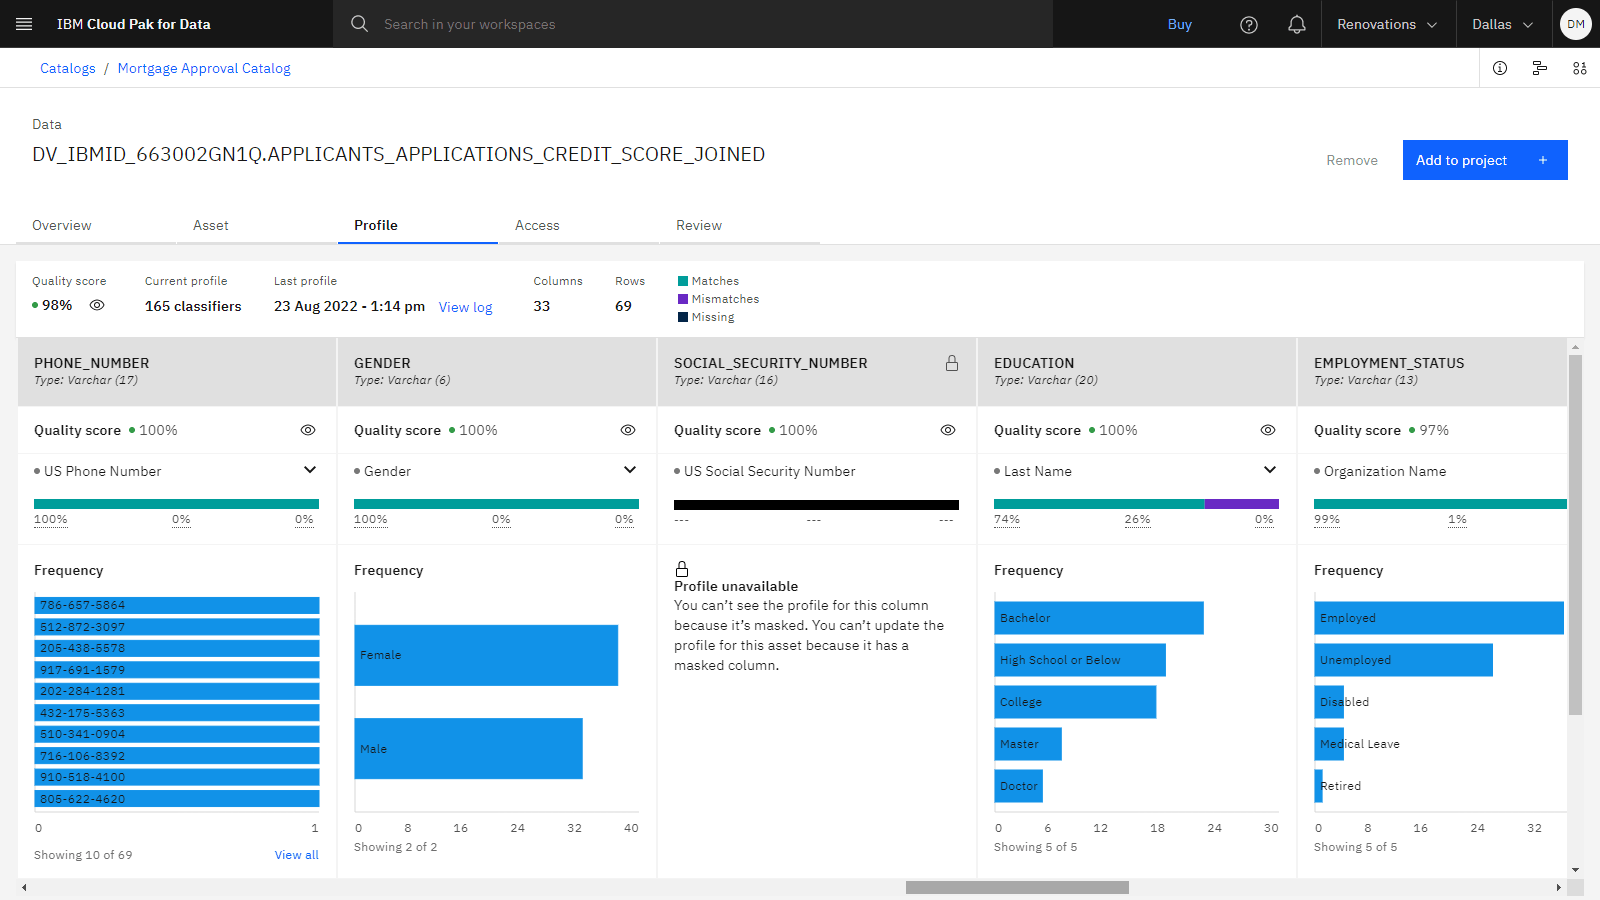
The following image shows the data preview of the virtual table in the catalog from the perspective of the user.
As data engineers and data stewards at Golden Bank, you enriched the virtualized data to ensure that the virtualized data is protected.
Cleanup (Optional)
If you would like to retake the tutorials in the Data governance use case, refer to the Cleanup section in each of the prerequisite tutorials:
Next steps
-
Try these tutorials:
-
View another Data fabric use case.
Learn more
Parent topic: Use case tutorials